2009 was an amazing year for me as far as riding was concerned. I logged a little over 11,000 miles, met many new people and rode the FZ in some amazing places! With the miles adding up on the bike it was time to spend some $$ and time on her and get her back in tip-top shape for 2010.
2010, a new year with some new parts ready to have miles of adventures put on them. Since the cold weather has set in I have been busy working on getting a few things done to the FZ to prepare for pulling the trailer as well a little maintenance and upkeep.
In order to prep the bike for pulling the trailer the following items were added: Ohlin’s rear shock, 0.85 N/mm fork springs (Ohlin’s), RaceTech Gold Valve Emulators, Stator Rewind, Acumen Digital Voltage Meter/Gear Indicator and added a hook up for the trailer lights.
In addition, I replaced the stock head bearings with All Ballz tapered roller bearings, cleaned and re greased the swing arm bearings, replaced the chain and sprockets, checked the tolerances in the valve train and rewired the air horn.
The work began the day I came home from Charlotte on winter break. With Dads current un-employment he was very eager to lend a hand and spin a few wrenches. So after cleaning up the shop and bit, the tunes were turned up and the bike started to come apart piece by piece.
Due to some communication errors, winter weather and the holidays , the project took a bit longer to complete than expected. However it did end being completed and I have the bike back in Charlotte now, ready to be ridden.
 Dad wanted to be sure to document the entire process so he was in charge of manning the camera as the work was going on. However, we both got a bit into the work from time to time and would completely forget about taking pictures.

 This is how the bike ended up after the first day of work. Really it was only about an hours worth as we got a late start and I had a dinner date with Alicia and her Mom. (Home made chili, is always good!)

 I have been working with a guy at Custom Rewind out of Birmingham Alabama on rewinding my stator to increase the voltage output in order to maintain the charge on the battery when running the electronics that have added to the motorcycle. Currently that stator has been rewound twice and the numbers just aren't matching up. Gary has never worked with a stator on a FZ6 before, so this a learning curve for both of us.
In order to have lights on the trailer, though for some silly reason they are not required by law in North Carolina, I needed to solder in a connection. For this project I chose a square 6 pin connector that way I would have the option to have a constant 12v power source on the trailer if needed.
On the FZ the harness for the tail lights, signals, ect. is located behind the left side pod on the bike. I had already spliced into the taillight wire to power the J&M intercom there and it has proven to be a good location for constant power with minimal noise. Once all the wires were located and there voltages determine I began cutting and soldering in the trailer light harness.
 The connector came with a decent amount of wire already attached, however it wasn't long enough to run the connector where I wanted it. So using some donated wire (Thank You!) I made a harness extension that would allow me to run the connector to the underside of the license tag.
 While I was messing with the wiring harness on the back of the bike I went ahead and replaced all the crimp connectors that were rusted with some nice solder joints that are now nicely shrink wrapped and sealed. :)
 In the fall of 2008 I added a small airhorn to the FZ to replace the dinky stock one that would make a mouse laugh. However, at some point last spring the horn started acting up and working half the time until it eventually just quit. I figure that the problem was probably in the relay so I purchased a new one and then worked on checking all the wires for breaks. In the process of all this I relaized, thanks to Alicia's mom, that I had wired the horn wrong and that was the start of the problem... With some new wire and better wiring diagram, the horn was successfully rewired and the new relay was added. Once again I have my 139 db's of goodness.


 While I was waiting on parts and killing some time around the house I decided that I needed to try and repolish my headed. Last year I purchased some good polish and attemped to clean up the header while it was on the bike. I did an ok job then, but I wasnt able to get it like I wanted. So I pulled the header, purchased some fine grade steel whool and went to town.

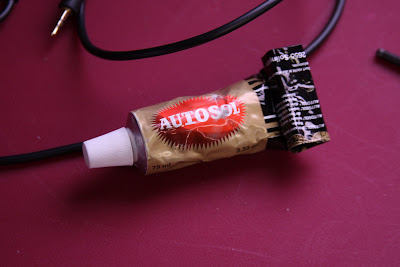
 After an hours worth of polishing I managed to use all the AutoSol and got the header looking nice again. The middle tubes didn't turn out as well due to all the rock dings and such, but its still better than nothing. This has me looking into a Fenda Extenda now...
 Once the chain came in I went ahead and cut the old one off. After my last ride to Boone I figure out that the chain had stretch badly in a few links causing some mesh issues on the rear sprocket. This led to a really annoying popping noise that had me scared to make my way home.
Once the chain was off I laid it flat on the floor and pushed the ends of the chain towards each other to see how much it would bend. This was the end result.
Yup it was toast...
 Once the suspension parts were ordered I went ahead removed the storage tray under the seat, pulled the swing arm and the rest of the exhaust. While the swing arm was off I went ahead and cleaned and repacked the bearings in the swing arm and took some time cleaning the chain lube that had deposited on the back side of the block. It was at this time that I promised myself this would be the last chain driven street bike I would own. Drive shafts have their advantages!


 The next day the Ohlin's parts arrived! Once the swing arm was back on the bike I worked on hanging the new shock. The Ohlin's unit has an oil reservoir that is connected via a braided line. This line was rather stiff so it made finding a nice spot to hang the reservoir a bit of a challenge.


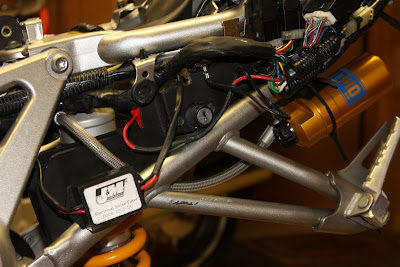 I ended up fitting it on the subframe and once the side pod was mounted the reservoir didn't look "that" out of place on the bike. I had to cut part of that tray in order to adjust preload on the spring and I also had to cut the bottom of the rear hugger so I could my hand around the rebound adjuster on the bottom of the shock.
I have been playing with the adjustment on the shock for a little bit now and I believe I have right about where I want it. It is so nice to be able to fine tune the shock now for my riding style. If only Yamaha would have included an adjustable shock on the bike from the factory.
Another item on the to-do list was to check the valves to see if they needed adjustment. The bike has over 30,000 miles on it now and to my knowledge they have never been checked. So we took the bike to do a friends shop in Albemarle, NC to see how they were. This motor will spin up over 12,000 RPMs and after 30,000 miles of riding they were all still very tight. No need for adjustments this round!


 PARTS ARRIVED! It was like Christmas again! Bearings, seals, sprokets, chain, oil and various other parts.
 For the new sprokets I went with an aluminum vortex sproket. The stock was a 46 tooth and to account for the extra weight when pulling the trailer and just because I wanted a bit more pull off the bottom I went to a 47 tooth rear. Didn't want something as excessise as dropping 1 tooth up front and I felt like 2 teeth in the rear would be too much. The new chain is a Tsubaki Alpha Gold which we have had amazing luck with on our dirtbikes. When Dad put one on his KTM the chain hardly ever streched. After the intial break in, the chain was never touched again. An expensive chain, but worth every penny.
After riding the bike with the new gearing, I must say I wish Yamaha would have geared it this way from the factory. The RPMs are a much better range for riding the corners aggressively at a moderate speed. The bike accelerates a little faster now, but nothing crazy and its like a freaking tractor in first gear. You can just let the clutch out with no throttle to get it moving now.
 To make the front end of the bike as nice as the rear, I replaced the factory springs with a set of 0.85 N/mm springs from Ohlins and added a set of Race Tech Emulators. This required a little work to install, but so far that have shown to make a world of difference!
 Showing the new sprocket and chain on the bike....
 Another addition was the Acumen DGV, which is a gear indicator and voltage meter. I really didn't care about the gear indicator as much I did the voltage meter. When the added electronics, I am constantly worried about the charge on the battery. For use on the FZ a small diode has to be added to a wire in the harness to prevent the neutral light on the factory cluster from coming on everything the clutch is pulled in. This unit also has a neat dimming feature that dims the indicator at night so that the light is not bothersome.
 Now that the emulators and head bearings had arrive it was time to pull the font end of the bike apart, starting with the forks.

I have never pulled a set of forks apart as we have always had a guy in Salisbury, NC do the work on our dirt bikes. (Bruce's Suspension) These forks are much simpler than those on my dirt bikes and unfortunately Bruce was recovering from a hip replacement. So with my lack of time available I decided that Dad and I should do the work ourselves. I wasn't aware that Dad was very familiar with these type of forks and after talking with Dad one evening we decided that we could tackle this one on our own.


 Race Tech recomends that damping holes in the damping rod need to be opened up (ALOT) and more hole should be added. This was basically removing the damping abilty in the damping rod and letting the emulator do all the work.
Using a 5/16" drill bit a drill press at Timmy's shop we successfully open up the damping rod...
Below you can see where the emulator sits on the damping rod. It is then secured by the spring which rests on top of the emulator.

 When assembling the forks and putting the new fork seals in place, Dad and I managed to damage one of the fork seals as I discovered a leak on the left tube once I took the bike back to Charlotte. However I was thinking some changes needed to be made regardless as the front end seemed a bit harsh now. I had 15w fork oil, the emulators set with 3 rounds on the yellow spring and 124mm of preload. When the new seals were added, I made a new set of preload spacers (120mm) dropped the fork oil to a 10 weight and took a half round off the spring. Alot of changes at once, but I think I really like where it is now!
Next in line were the head bearings. Yamaha's factory ball bearing did not seal very well and ultimately rusted after a year or so in use. These bearings were replaced with tapered rollers made by All Ballz. It took a little work to get the old races out and the new ones in, especially on the lower side. In addition we had to get Alan to remove the old race from the steering stem and press the new one on.

 Overall, I have a completely different bike now! I have rode the bike a hanful of times since the work was completed (200 miles max) and the combination of all the changes have made a huge difference. The bike has so much more feel now and responds the riders input so much better now. I never realized how numb feeling the bike was until the changes were made.
Now that the bike is done, it is time to work on the trailer. I have made a contact with a guy in Salisbury that will be welding the trailer. Once some modeling changes are made and the design is checked with a FEA program, building will start. (Early March)
In addition to the trailer build up I have been thinking and talking a lot with Dad about rides for this coming year. For the past couple years we always start talking about what we want to accomplish in the year ahead.
After last years ride to West Virgina, I have become extremely fascinated with that area and look forward to making another trip up that way. I would like to spend more time at the Green Bank National Radio Observatory, eat another 12.00 banana split at the Green brier and would like to spend some more time riding through coal country.
Another goal is to cross the Mississippi River. I have been wanting to do this for sometime now and I am about bound and determined to do it this year. Mom has talked about going to North Dakota for my graduation ride for some time now. Realizing that this might not be an option, I have really started looking towards going to New Orleans. Ride through Nashville on the way there, cross the Mississippi and then go see what New Orleans has to offer.
A must do this year is to join an elite club known as the Iron Butt Association (IBA) to join this a rider must log over 1000 miles in 24 hours which is known as the SS1000. There are other goals that can be accomplished once in the association, but the SS1000 in the entry level. Dad and I have talked about this for a could years know and after plans were changed last year, we are bound and determined to do it this year!
On the FZ6 forum there are talks of having another Deals Gap ride around the first of August which I will try to attend. For the past few years I have made one trip up to Robbinsville, NC each season. I hope to continue this pattern and hopefully start making the trip more often.
As far as the MTF is concern there is a ride going on somewhere in The Smokies', however it is over Labor Day weekend. Not 100% sure on riding that area at that time as traffic will be a bit heavy and I tend to get frustrated when stuck behind slow traffic on fun roads...
But either way, plans are to ride and to ride alot. Once the last semester of my college career is over I will begin the job hunt and really my riding will depend on how that goes. So we shall see.


